Investigate and close an Entra finding
Prerequisites
- Product permission
entra.readto read the inbox, a finding and its signal definition. - Product permission
entra.adminto change finding state, apply a bulk action, or run a scanner. - Product permissions
entra.readandinvestigate.readto open the Entra shell and a principal dossier.investigate.activityis separately required to read behavioral history. - A completed collection for the tenant. The inbox reads the snapshot; it never collects on its own.
- Tier 1 consent produces findings across posture, applications and directory roles. Tier 2 and tier 3 consent, plus Entra ID P1/P2, are what make the risk, PIM and governance signals measurable rather than blind.
Route
/entra/findings for the inbox, scanners and identity hygiene; /entra/investigate for one principal; and the deep-dive tabs at /entra/conditional-access, /entra/privileged, /entra/applications, /entra/signals and /entra/governance for context.
How to filter the inbox to a working set
-
Open
/entra/findingsand stay on the Findings inbox sub-tab. - Use the severity chips to narrow to Critical or High. Each chip carries its own count, so you can see the size of the working set before you commit to it.
- Use the state chips to separate Open from Snoozed. An expired snooze returns to open on its own; nobody has to remember to un-snooze it.
- Add Unassigned to find work with no owner, and Ageing > 30d to surface findings that have been open long enough to be a process failure rather than a new event.
- Use the search box to narrow to an object name or finding title.
- Read the summary line: total findings, how many are suppressed, and how many were resolved automatically because the condition stopped appearing.
Expected result: A short, ordered list — worst severity first, then oldest — that one person can actually work through.
Verification: The row count in the summary line matches the filter chips you selected, and the Age column shows a first-seen age rather than a collection timestamp.
How to investigate one finding and record an owner
-
Select a row to open the finding drawer.
- Read the title, detail and evidence. The shared drawer shows Why this matters and remediation only when a signal definition is supplied; the current inbox does not pass that definition. Use the signal catalog or finding-detail API if those blocks are absent.
- Read the Evidence list. These are the exact values the signal fired on and they are what make the score verifiable rather than a black box.
- Read the Remediation section, including the numbered steps where the signal provides them.
- Follow the portal link to validate the object in the Microsoft Entra admin center, and the documentation link where the signal carries one. Graph data is cached and eventually consistent — validate before you act.
- Record the owner in the approved review system, or use the finding-state API’s
assigneefield. The inbox displays existing assignees and filters Unassigned, but its current drawer/bulk bar does not edit assignees. - Select Acknowledge to mark the finding as being worked. Use Reopen to move it back to open if the investigation shows it was acknowledged in error.
Expected result: A finding in the acknowledged state with an owner, and a validated understanding of what has to change in Entra.
Verification: The row’s state changes in the inbox and the assignee appears beneath it. Confirm the underlying object still matches the evidence in the Microsoft Entra admin center.
How to investigate one principal across identity evidence
- Open
/entra/investigatefrom a finding or select the principal directly. - Confirm the principal identity and object type before reading access, group, application, sign-in, or activity evidence.
- If the header and warning banner show ⚠ disabled, treat that as the account state in the cached snapshot—not as proof that assignments, group membership, active tokens, or historical actions are gone. Prioritize the Access, Members, Activations, and Findings sections.
- Expect an automatic, bounded non-Azure activity request on arrival when applicable. It needs
investigate.activityand may be denied while structural detail remains visible. Azure Activity Log is not included automatically. - Follow handoffs to IAM or Conditional Access only when the destination preserves the same principal or scope.
- Validate significant conclusions against the named source record and the current Entra portal state.
Expected result: One principal’s identity, structural reach, and available activity evidence are correlated without treating missing domains as clean results.
Verification: The selected object remains the same across each handoff, timestamps are current enough for the decision, and every conclusion cites source evidence.
How to expand memberships without losing coverage limits
Start with the cached membership and change examples. A cached group list is a starting point, not proof that every membership has been enumerated.
- Confirm the same principal and tenant before requesting more membership detail.
- For a user, use Read every group live and include nested when the review needs upward transitive membership. Keep any unreadable or truncated branches in the review notes.
- For a group, use Show member tree to distinguish direct user members from nested groups, then expand only the branches needed for the decision.
- Stop at a cycle marker rather than interpreting a repeated group as another independent path. Check the bounded tree and its source notes before drawing conclusions about completeness.
The three views below use browser fixtures. Their on-demand membership controls are intercepted by those fixtures; no directory request leaves the browser boundary, and the examples do not validate backend membership collection.
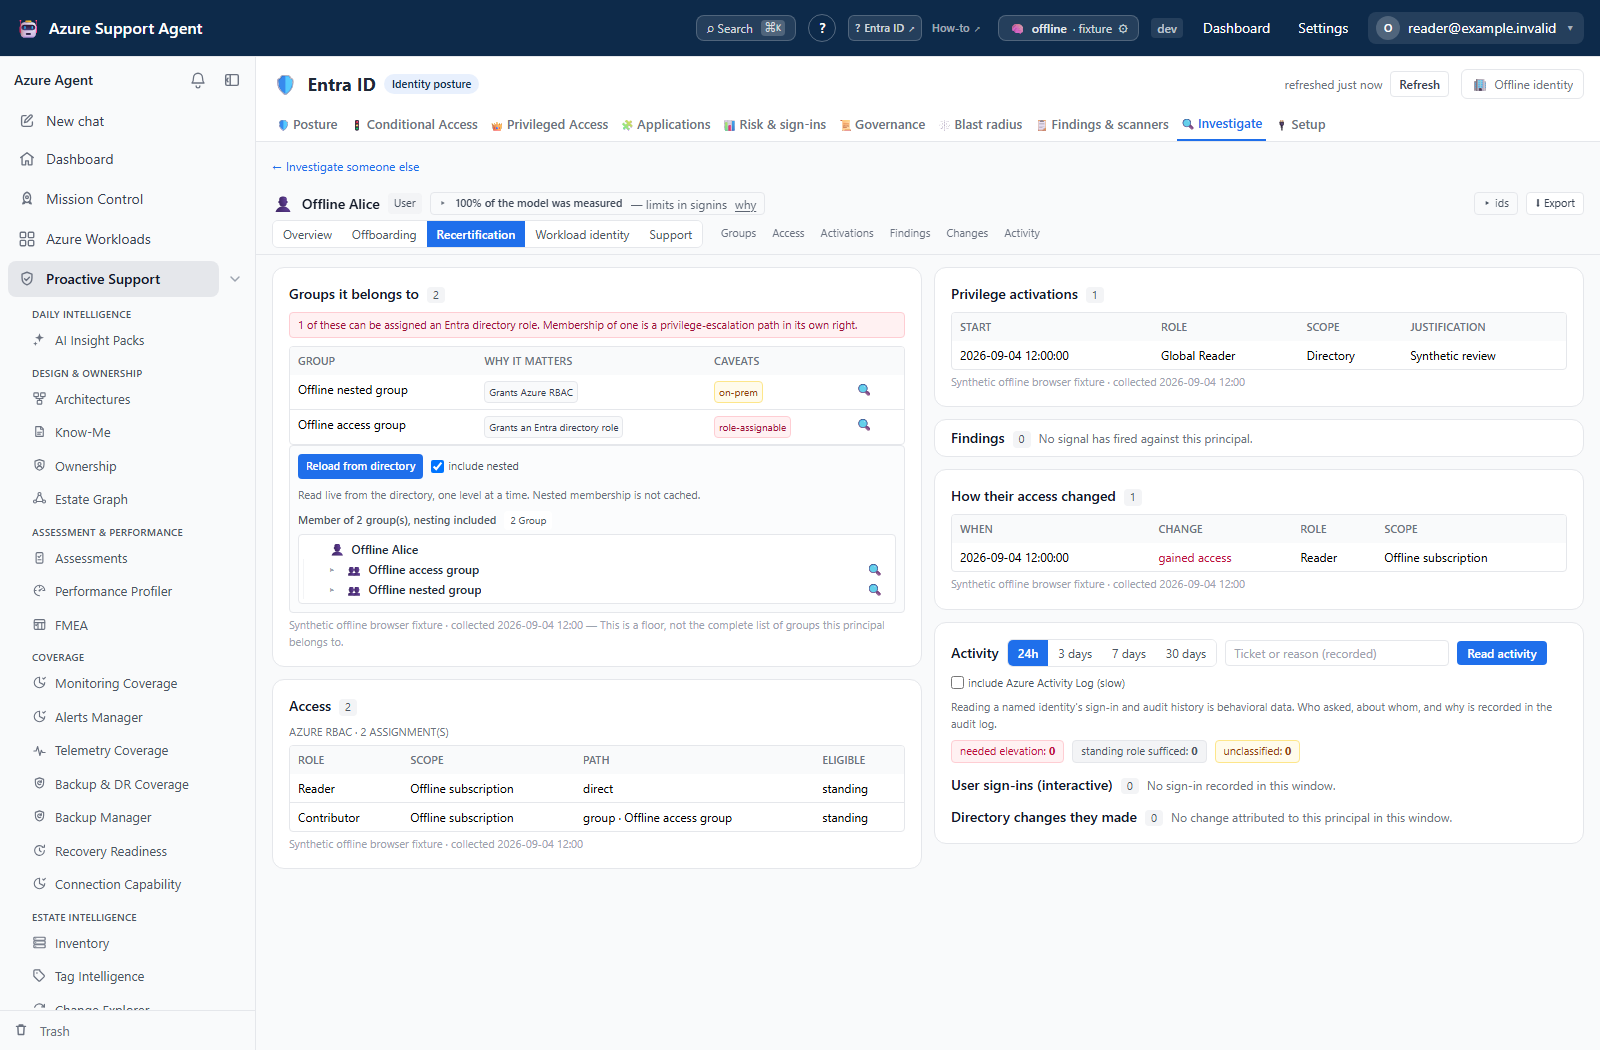
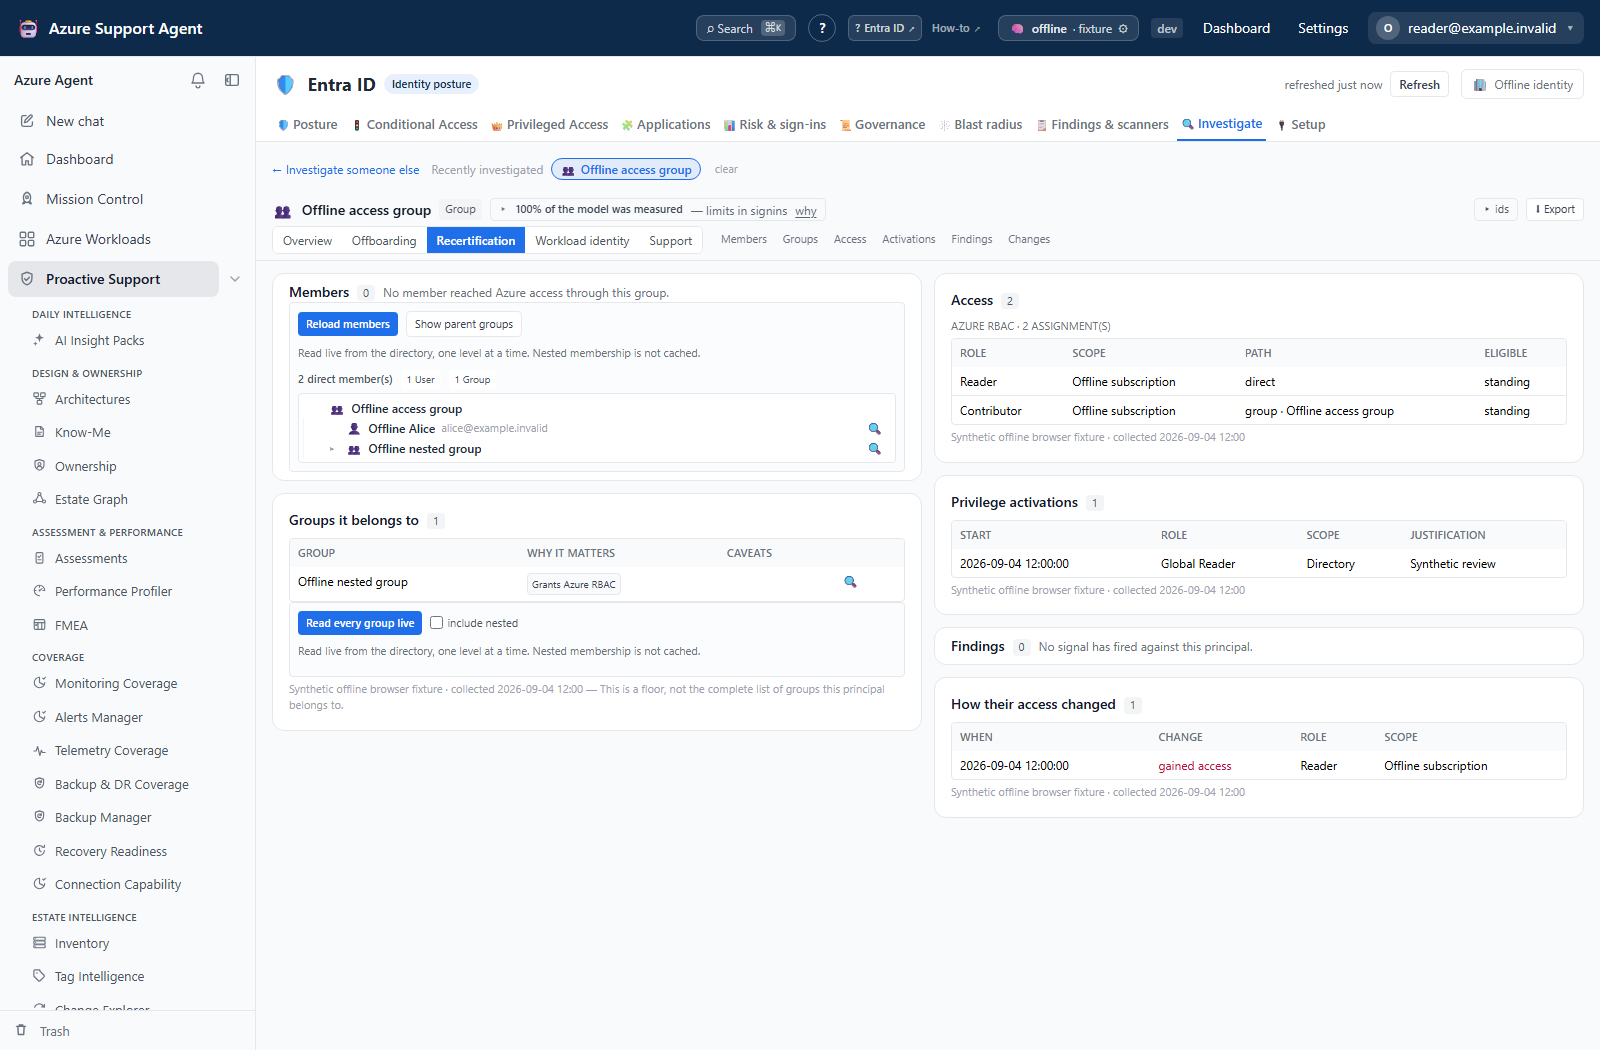
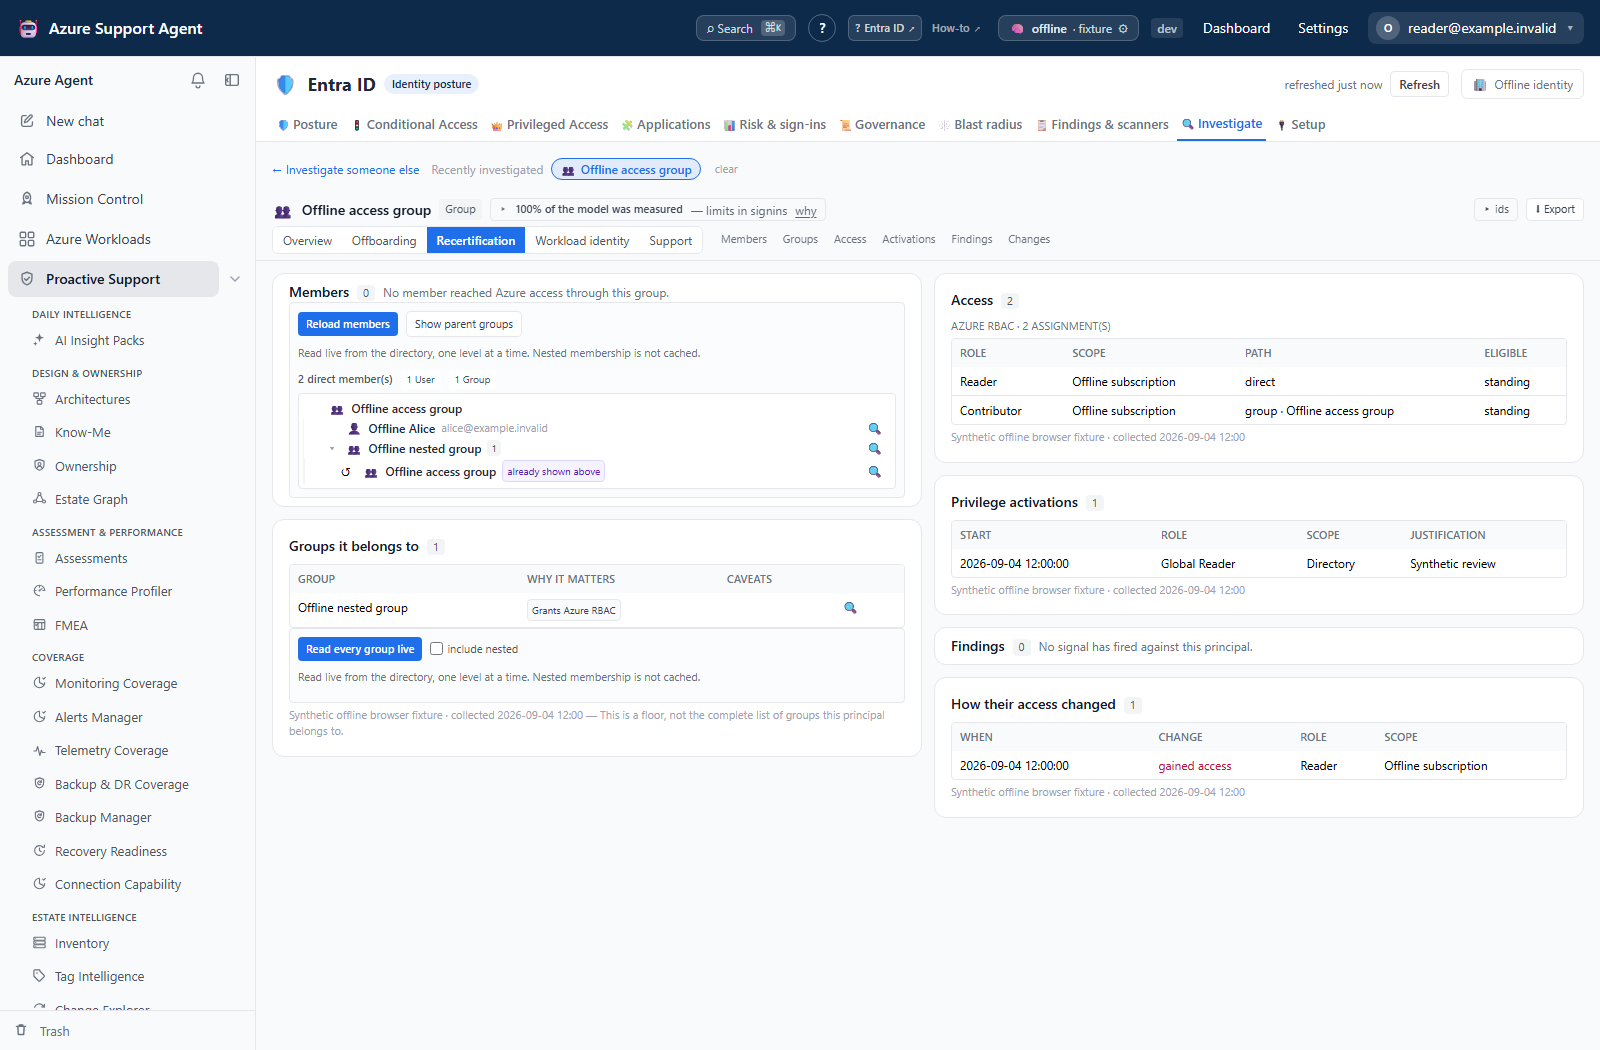
Expected result: Direct membership, nested paths and cycle or coverage limits remain distinguishable in the investigation.
Verification: Confirm consequential membership paths against current directory evidence. The dossier XLSX does not include branches expanded in the browser, so retain the required review evidence separately.
How to review a disabled principal for residual access
- Open
/entra/investigate, search for the principal, and confirm the object ID and tenant. - Confirm the amber ⚠ This account is disabled. banner and ⚠ disabled header badge are present. If they are absent, do not infer enabled state; check snapshot freshness and resolution.
- Use the Offboarding lens for a person or Workload identity for a service principal or managed identity.
- Review standing and eligible Entra roles, Azure assignments, transitive group membership, privilege activations, findings, and access-change history. Disabled state does not remove them.
- The initial non-Azure activity request may already have run with an empty reason. For a deliberate reread, enter the ticket/reason, choose the shortest useful window and select Read activity. Include Azure Activity Log only when resource-plane evidence is needed.
- Export the dossier when an evidence workbook is required, then validate account state and any remaining assignments in the authoritative Entra and Azure views.
Expected result: The disabled state is visually unmistakable while residual structural access and available history remain reviewable rather than being hidden as though disablement removed them.
Verification: The dossier warning matches the current Entra account state, every retained assignment is accounted for, unreadable/truncated sections remain labeled, and the activity/export audit record identifies the reviewer and principal without changing Entra or Azure.
How to snooze or suppress deliberately
-
Select one or more rows with the row checkboxes. The bulk bar appears with the selection count.
- To defer, choose Snoozed, set the number of days, and add a reason. A snooze must have a duration so it can expire on its own and return the finding to open.
- To close without fixing, choose Suppressed and enter a reason. The reason is mandatory: a suppression is a decision that this finding does not apply to your tenant, not evidence that the risk was removed.
- Understand the consequence before suppressing. Suppressions persist across refreshes, are never rewritten by a collection, and are excluded from the posture score — so a suppressed finding stops costing points while the underlying configuration is unchanged.
- Select Apply. Use Clear to abandon a selection.
- Review suppressions periodically. The summary line always shows how many exist.
Expected result: The selected findings carry the chosen state with a durable reason, and snoozes carry an expiry date.
Verification: Filter by Snoozed for deferred work. Preserve suppressed fingerprints and reasons: suppression removes them before normal inbox listing/scoring, so filtering is not a way to retrieve all suppressed rows. Compare returned updated with the request (maximum 2,000), not just a chip count.
How to close the loop after remediation
-
Remediate outside this app, in the Microsoft Entra admin center, through your approved change process. Nothing in this feature writes to the directory.
- Return to
/entraand select Refresh to collect a new snapshot, then wait for the progress strip to finish. - Open
/entra/findingsand read the recently resolved entries in the summary line. A finding resolves when the condition stops appearing in a collection, not when someone ticks a box. - Read the posture headline on
/entrafor the change since the previous run, and use the pillar breakdown to confirm the points came back where you expected. - Re-run the relevant scanner from the Scanners sub-tab if you want a targeted re-check. Scanners read the current snapshot and never call Microsoft Graph, so running one repeatedly during an investigation is safe.
- If the finding is still present, compare the evidence against the change you made before assuming the collection is wrong.
Expected result: The remediated finding is absent from the new snapshot and appears in the resolved set.
Verification: The finding no longer appears under an unfiltered view, the score delta is consistent with the signal’s severity weight, and the Entra portal shows the corrected configuration.
Safety and rollback
Reading the inbox/finding and scanner results does not record a scanner run. Workflow actions and scanner baselines are local writes, not directory changes. A state can be reopened (use its retained fingerprint through the API if suppression removed it from the UI), but running a scanner advances its baseline and reopening a finding does not restore that earlier delta. UI scanner runs send notify=false.
A resolved fingerprint may reflect suppression or lost measurement rather than remediation. Verify equivalent collector coverage and the live configuration before claiming closure. Investigate’s XLSX exports cached structural evidence, not its live activity response or expanded membership branches.
The remediation itself always happens in Entra through your change process, with its own approval and rollback. Treat a bulk suppression as the highest-risk action on this page, because it removes findings from the score for everyone who reads it afterwards. Never paste real tenant IDs, object IDs, user principal names or evidence values into tickets, prompts or exported examples.
Troubleshooting
| Symptom | Resolution |
|---|---|
| The inbox is empty and says nothing is loaded | Run a collection from the freshness badge; the inbox never collects on its own. |
| A state change returns a permission error | Workflow actions require entra.admin, not entra.read. |
| Suppress is rejected | A suppression requires a reason; enter one and re-apply. |
| A snooze is rejected in the bulk bar | A snooze requires a number of days so it can expire on its own. |
| A remediated finding is still listed | The snapshot predates the fix. Refresh, then re-read the inbox. |
| A scanner says it cannot run | Its domain is blind or unlicensed; reporting zero findings would be indistinguishable from having looked. Fix coverage first. |
| The score moved but no finding changed | Coverage changed. Compare measured pillars rather than the headline number. |
| A known disabled account has no amber warning | The snapshot may predate disablement, the object may be unresolved, or enabled state was unreadable. Refresh the Entra snapshot and verify the same tenant/object in the Entra admin center. |
| Read activity returns a permission error | Structural dossier reads use investigate.read; behavioral history requires the separate investigate.activity capability. |